
To photograph a room with bright windows, compare the room and the outside view before choosing your brightness. If your phone can't keep useful detail in both, try a different time, light setup, or camera position.
If you're taking listing photos for a property, the room still needs to show its layout and key features. A clear garden view helps only if you can also read the room.
A brightness slider changes the capture. It doesn't change how much brighter the outdoors is than the room. Start by looking at that difference.
Home photos: work for DeClue Homes.
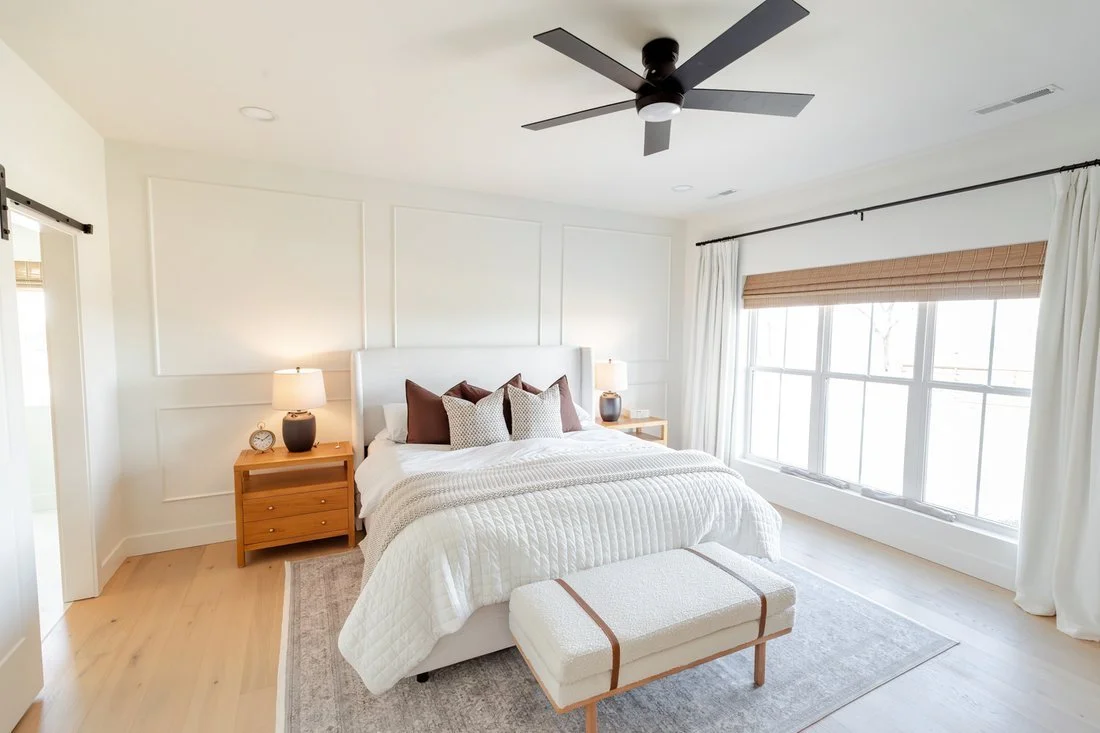
The window, nearby wall and bedding give you three areas to inspect.
Decide what this view needs to show
Name what matters in the photo. A living room view might need to show the seating area, the windows, and the door to the patio. A view through another part of the room might explain the layout without looking directly into the brightest glass.
If the outside view is an important property feature, keep it in the plan. You may need another capture or time of day to show it clearly. Choose the position for the information the photo needs to carry.
Choose a position for the room and bright windows
Start where you can show the features you named. Look at the window frames and door frames. Keep the phone upright so those edges stay straight, then move your feet to refine the view.
Try a small move to the side before changing lenses. Check whether you can still see the window, the seating area and the doorway. A new position may show more of a lit wall and less bright glass. It also changes how the room looks, so compare the whole view.
If the important outside view disappears, keep a separate photo in your plan for it. Do not give up needed property information to avoid a hard exposure choice.
Take a first photo and inspect both areas
Take the phone's automatic photo first. Open the saved file and look at three parts: the window, a wall near it, and furniture farther into the room.
Can you see useful detail in each? Is the furniture too dark to read? Is the outside a blank shape? Are curtains and window frames still clear?
Your phone may combine exposures automatically. Apple explains how iPhone HDR combines several exposures. The result and available controls depend on the device and scene. Judge the saved photo rather than assuming the preview or an HDR label guarantees the result.
Compare a brighter and darker capture
On an iPhone, tap the part of the frame you want to focus on and adjust brightness. Apple's camera-tools guide describes the focus area and exposure control. The focus and exposure lesson explains the controls and the differences between device versions.
Take one photo with the room looking brighter. Then make a darker capture and compare the window. Keep the framing steady so you can judge the brightness change.
Look at what improved and what you lost. A clearer view outside may come with furniture that is too dark. A brighter room may lose the outside view. You are checking whether this scene fits what the phone can capture from this position.
Change the light when a brightness change isn't enough
If neither capture works, compare the actual light. Try the room with its indoor lights on and off, keeping the phone position the same.
Look at wall color as well as brightness. A lamp may brighten a corner while making one side of a wall yellow. Daylight from the window may make another part look cooler.
Adobe's real estate photography guide describes both natural-light and added-light approaches, along with mixed-color limits. There is no one lights-on rule for every room. Choose by what the saved photos show. If the result still doesn't hold the needed detail, another time may serve the room better.
A single warm-or-cool adjustment affects the whole photo. It may improve the lamp-lit wall while making the window side too blue. Our white balance lesson explains that limit. Check the light sources before making more color changes.
Return when the brightness difference is lower
Look at when direct sun reaches the window and how the room changes through the day. A time with less direct light outside may give you a more useful balance.
You can also compare a different view. Moving away from a direct view into the window may change the photo's job while still showing the room clearly.
Check the space before committing to a return time. The front exterior, rear exterior, and different rooms may call for different light. Keep those notes with your shot list.
Edit the detail that is in the file
Keep the original. Adjust overall brightness, then check highlights and shadows. Compare each change with the source.
If the phone captured window detail, an adjustment may help reveal it. If the source contains a blank white area, lowering highlights may only make the blank area gray. It won't supply a reliable view of what was outside.
The Exposure, Highlights and Whites lesson explains this limit using Lightroom. The same source check matters when you use the phone's editing tools.
Stop when the edit keeps the room believable and shows the needed features. If a large edit leaves gray windows, muddy furniture, or uneven color, compare another capture rather than continuing to push the sliders.
Questions about bright windows in phone photos
Should I tap the window or the room?
Start with the part you need sharp, then adjust brightness while watching both areas. Tapping the window alone does not guarantee useful detail in the furniture.
Will HDR fix every bright window?
No. Open the saved file and inspect the window frames, outside view and room. If one area still loses needed detail, change the light, position or time.
Should every window show a clear outside view?
Choose by the information the listing needs. If the view is a property feature, plan a capture that shows it. Bright glass may matter less in another room, but keep its frames and nearby surfaces clear.
Can I fix orange and blue walls with one slider?
One change affects the whole photo, so it may leave different parts with different colors. Compare the room lights on and off before choosing your next capture.
When should I take another photo?
Take another when the saved file cannot show the needed features after a modest edit. Make a note of the missing detail, then try another light setup, view or time.
Practice with one room
Choose a room with a bright window and keep the phone position steady.
- Take the automatic photo.
- Make a brighter capture for the room.
- Make a darker capture for the window.
- Compare the saved files at full size.
- Change one light source or return at a different time, then take another photo.
Write which capture shows the room most clearly and what still needs work. Keep those originals. They help you see whether the next choice improved the room, the window, or both.
Keep your light notes with your room list. The free Listing Photo Field Guide has space for views you need to retake or return for.
